티스토리 뷰
이번 포스트에서는 안드로이드외 비콘을 연동하는 방법에 대해서 설명하고자 한다. 필자가 사용한 비콘은 리니어블 밴드(Lineable Band) 라는 제품이다.
시작하기 전에 짚고 넘어가야 할 것이 있다. 비콘은 일반적인 블루투스 센서로는 감지가 되지 않는다. 필자가 사용한 리니어블 밴드는 전용 앱과 연동하기 위해 특정 버튼을 클릭할 때에만 블루투스 감지가 가능하며, 가만히 놔뒀을 때에는 비콘 전용 라이브러리를 사용해야만 감지할 수 있다.
비콘 전용 라이브러리로는 크게 두 가지가 있다. 첫 번째는 AltBeacon의 android-beacon-library 이고, 다른 하나는 estimote 이다. 본 글에서는 android-beacon-library를 사용하는 방법을 가이드한다.
우선 프로젝트를 아무렇게나 하나 생성한 다음, build.gradle(Module: app) 에서 dependencies를 아래와 같이 수정한다.
compile 'org.altbeacon:android-beacon-library:2+' 라인이 추가되었다. 추가한 뒤 상단의 Sync now를 클릭.
MainActivity.java 파일을 아래와 같이 수정한다.
1 2 3 4 5 6 7 8 9 10 11 12 13 14 15 16 17 18 19 20 21 22 23 24 25 26 27 28 29 30 31 32 33 34 35 36 37 38 39 40 41 42 43 44 45 46 47 48 49 50 51 52 53 54 55 56 57 58 59 60 61 62 63 64 65 66 67 68 69 70 71 72 73 74 75 76 77 78 79 80 81 82 83 84 85 86 87 88 89 90 91 92 93 94 95 96 97 98 99 | package com.example.alicek.mybeacon2; import android.os.Handler; import android.os.Message; import android.os.RemoteException; import android.support.v7.app.AppCompatActivity; import android.os.Bundle; import android.view.Menu; import android.view.MenuItem; import android.view.View; import android.widget.TextView; import org.altbeacon.beacon.Beacon; import org.altbeacon.beacon.BeaconConsumer; import org.altbeacon.beacon.BeaconManager; import org.altbeacon.beacon.BeaconParser; import org.altbeacon.beacon.RangeNotifier; import org.altbeacon.beacon.Region; import org.w3c.dom.Text; import java.util.ArrayList; import java.util.Collection; import java.util.List; // 비콘이 쓰이는 클래스는 BeaconConsumer 인터페이스를 구현해야한다. public class MainActivity extends AppCompatActivity implements BeaconConsumer { private BeaconManager beaconManager; // 감지된 비콘들을 임시로 담을 리스트 private List<Beacon> beaconList = new ArrayList<>(); TextView textView; @Override protected void onCreate(Bundle savedInstanceState) { super.onCreate(savedInstanceState); setContentView(R.layout.activity_main); // 실제로 비콘을 탐지하기 위한 비콘매니저 객체를 초기화 beaconManager = BeaconManager.getInstanceForApplication(this); textView = (TextView)findViewById(R.id.Textview); // 여기가 중요한데, 기기에 따라서 setBeaconLayout 안의 내용을 바꿔줘야 하는듯 싶다. // 필자의 경우에는 아래처럼 하니 잘 동작했음. beaconManager.getBeaconParsers().add(new BeaconParser().setBeaconLayout("m:2-3=0215,i:4-19,i:20-21,i:22-23,p:24-24,d:25-25")); // 비콘 탐지를 시작한다. 실제로는 서비스를 시작하는것. beaconManager.bind(this); } @Override protected void onDestroy() { super.onDestroy(); beaconManager.unbind(this); } @Override public void onBeaconServiceConnect() { beaconManager.setRangeNotifier(new RangeNotifier() { @Override // 비콘이 감지되면 해당 함수가 호출된다. Collection<Beacon> beacons에는 감지된 비콘의 리스트가, // region에는 비콘들에 대응하는 Region 객체가 들어온다. public void didRangeBeaconsInRegion(Collection<Beacon> beacons, Region region) { if (beacons.size() > 0) { beaconList.clear(); for (Beacon beacon : beacons) { beaconList.add(beacon); } } } }); try { beaconManager.startRangingBeaconsInRegion(new Region("myRangingUniqueId", null, null, null)); } catch (RemoteException e) { } } // 버튼이 클릭되면 textView 에 비콘들의 정보를 뿌린다. public void OnButtonClicked(View view){ // 아래에 있는 handleMessage를 부르는 함수. 맨 처음에는 0초간격이지만 한번 호출되고 나면 // 1초마다 불러온다. handler.sendEmptyMessage(0); } Handler handler = new Handler() { public void handleMessage(Message msg) { textView.setText(""); // 비콘의 아이디와 거리를 측정하여 textView에 넣는다. for(Beacon beacon : beaconList){ textView.append("ID : " + beacon.getId2() + " / " + "Distance : " + Double.parseDouble(String.format("%.3f", beacon.getDistance())) + "m\n"); } // 자기 자신을 1초마다 호출 handler.sendEmptyMessageDelayed(0, 1000); } }; } | cs |
레이아웃파일은 의미가 별로 없지만... activity_main.xml 파일도 수정한다.
1 2 3 4 5 6 7 8 9 10 11 12 13 14 15 16 17 18 19 20 21 22 23 | android:layout_height="match_parent" android:paddingLeft="@dimen/activity_horizontal_margin" android:paddingRight="@dimen/activity_horizontal_margin" android:paddingTop="@dimen/activity_vertical_margin" android:paddingBottom="@dimen/activity_vertical_margin" tools:context=".MainActivity"> <TextView android:text="@string/hello_world" android:layout_width="wrap_content" android:layout_height="wrap_content" android:id="@+id/Textview" /> <Button android:layout_width="wrap_content" android:layout_height="wrap_content" android:text="Run" android:id="@+id/button" android:layout_centerVertical="true" android:layout_centerHorizontal="true" android:onClick="OnButtonClicked" /> </RelativeLayout> | cs |
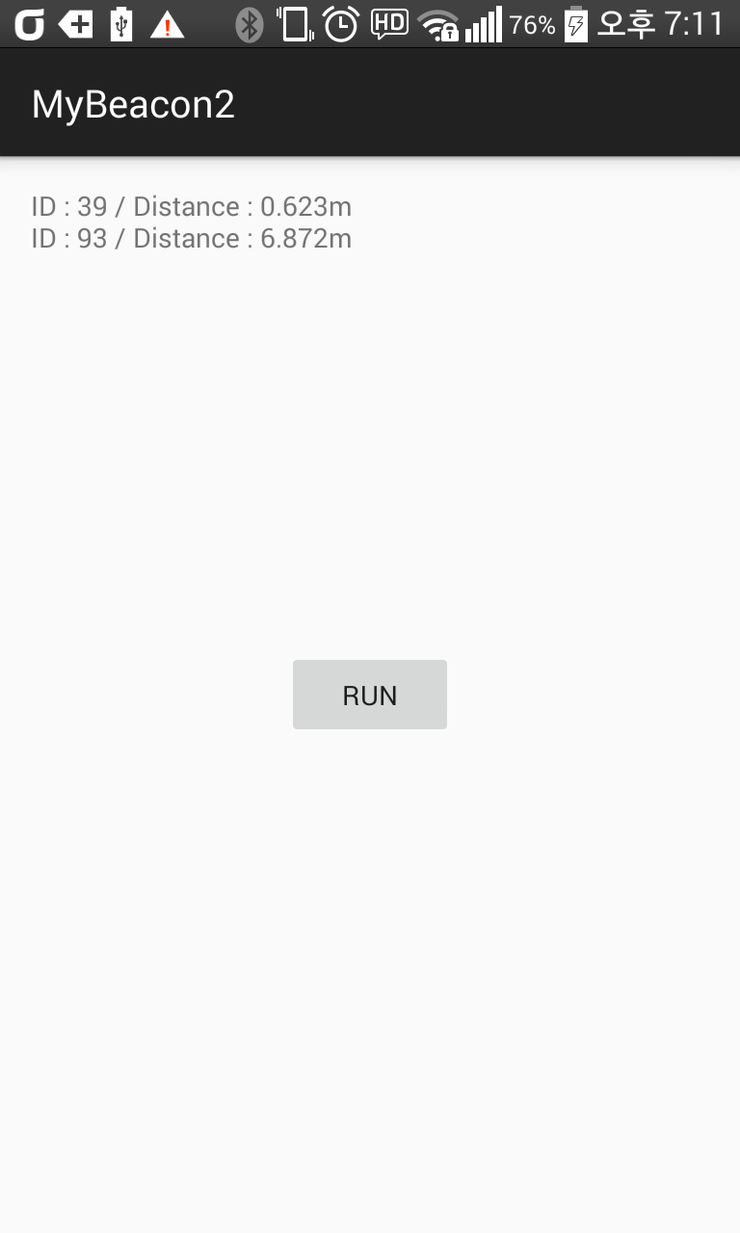
참고로 에뮬레이터는 비콘을 감지하지 못하는 듯 하니, 실제 폰으로 실행해보는 것을 추천한다. 필자는 아래와 같은 출력 화면을 얻을 수 있었다. 처음 시작시에는 아무것도 하지 않다가 버튼을 누르면 주위에 있는 비콘들의 아이디와 거리를 측정하여 텍스트뷰로 뿌려준다.

+ 추가 : 프로젝트 파일을 아예 통째로 올려놨으니 참고하세요.
[출처] 50. [Android] 안드로이드 비콘 연동하기|작성자 alice
'개발 > 개발 자료' 카테고리의 다른 글
| (Android) 안드로이드 키보드 옵션 (0) | 2016.03.14 |
|---|---|
| (MySQL) mysql connection 수 보기 ERROR 1040 (08004): Too many connections (0) | 2016.03.09 |
| (IOS) View Life Cycle (0) | 2016.03.02 |
| (JSP)gmail smtp서버를 이용하여 메일보내기 (0) | 2016.03.01 |
| (JSP) 세션을 이용한 로그인 처리 (0) | 2016.02.26 |

